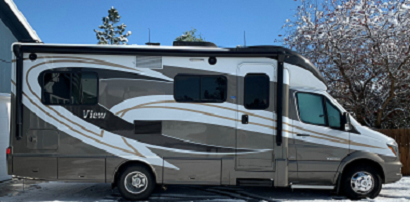
winnieView
Modifications Done
Here are the modifications I have done so far. I have a 2016 View model 24V. Many of these are common to most models and years.
Projects
electrical | solar | thermometer | refrigerator | water bay | sewer | recliners | kitchen drawer | chassis | bedroom | shower | workstation | cab | waterheater | accumulator tank | air conditioning | suspension | awning
ELECTRICAL |
[back to top] |
|---|---|
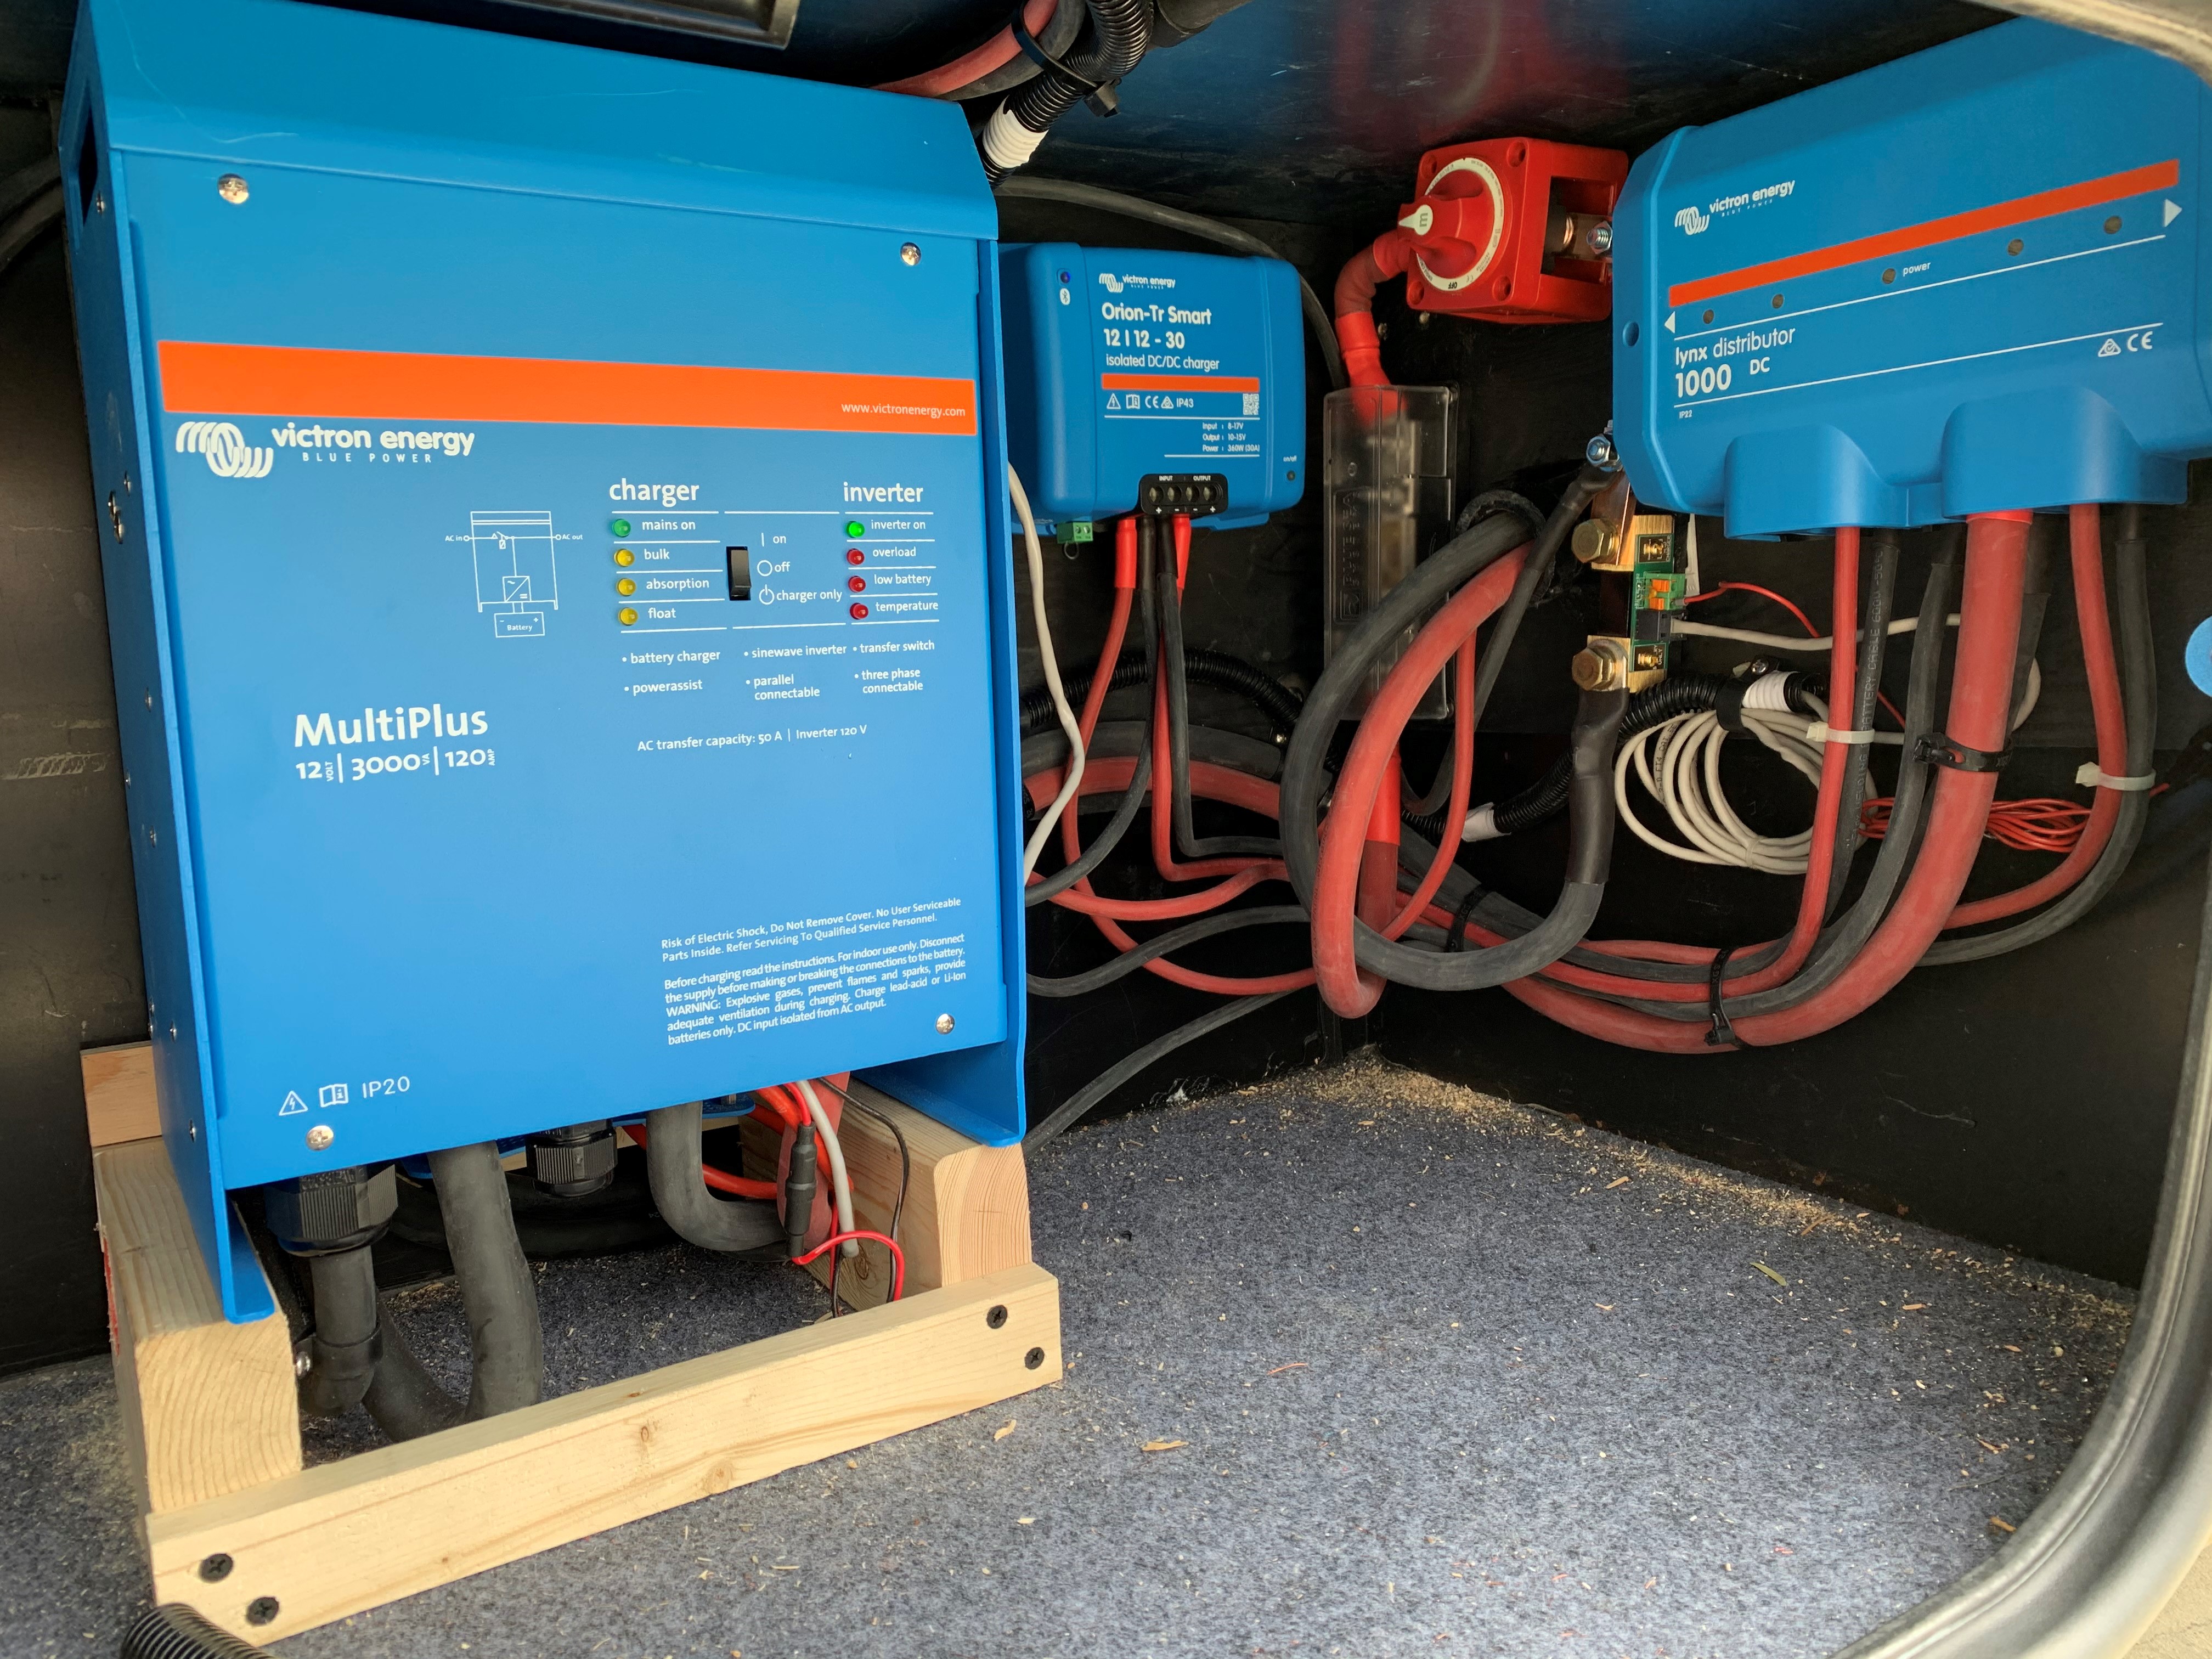 |
Phase 1 of my electrical upgrades included lithium batteries, a 3k inverter/charger, a DC/DC charger, and an Automatic Transfer Switch. The RV now can run everything from the inverter. I decided to take up about half of the storage bay just next to the main door and have the electrical equipment accessible. All of the main battery and inverter wiring had to be replaced with larger capable of handling the increase amperage. |
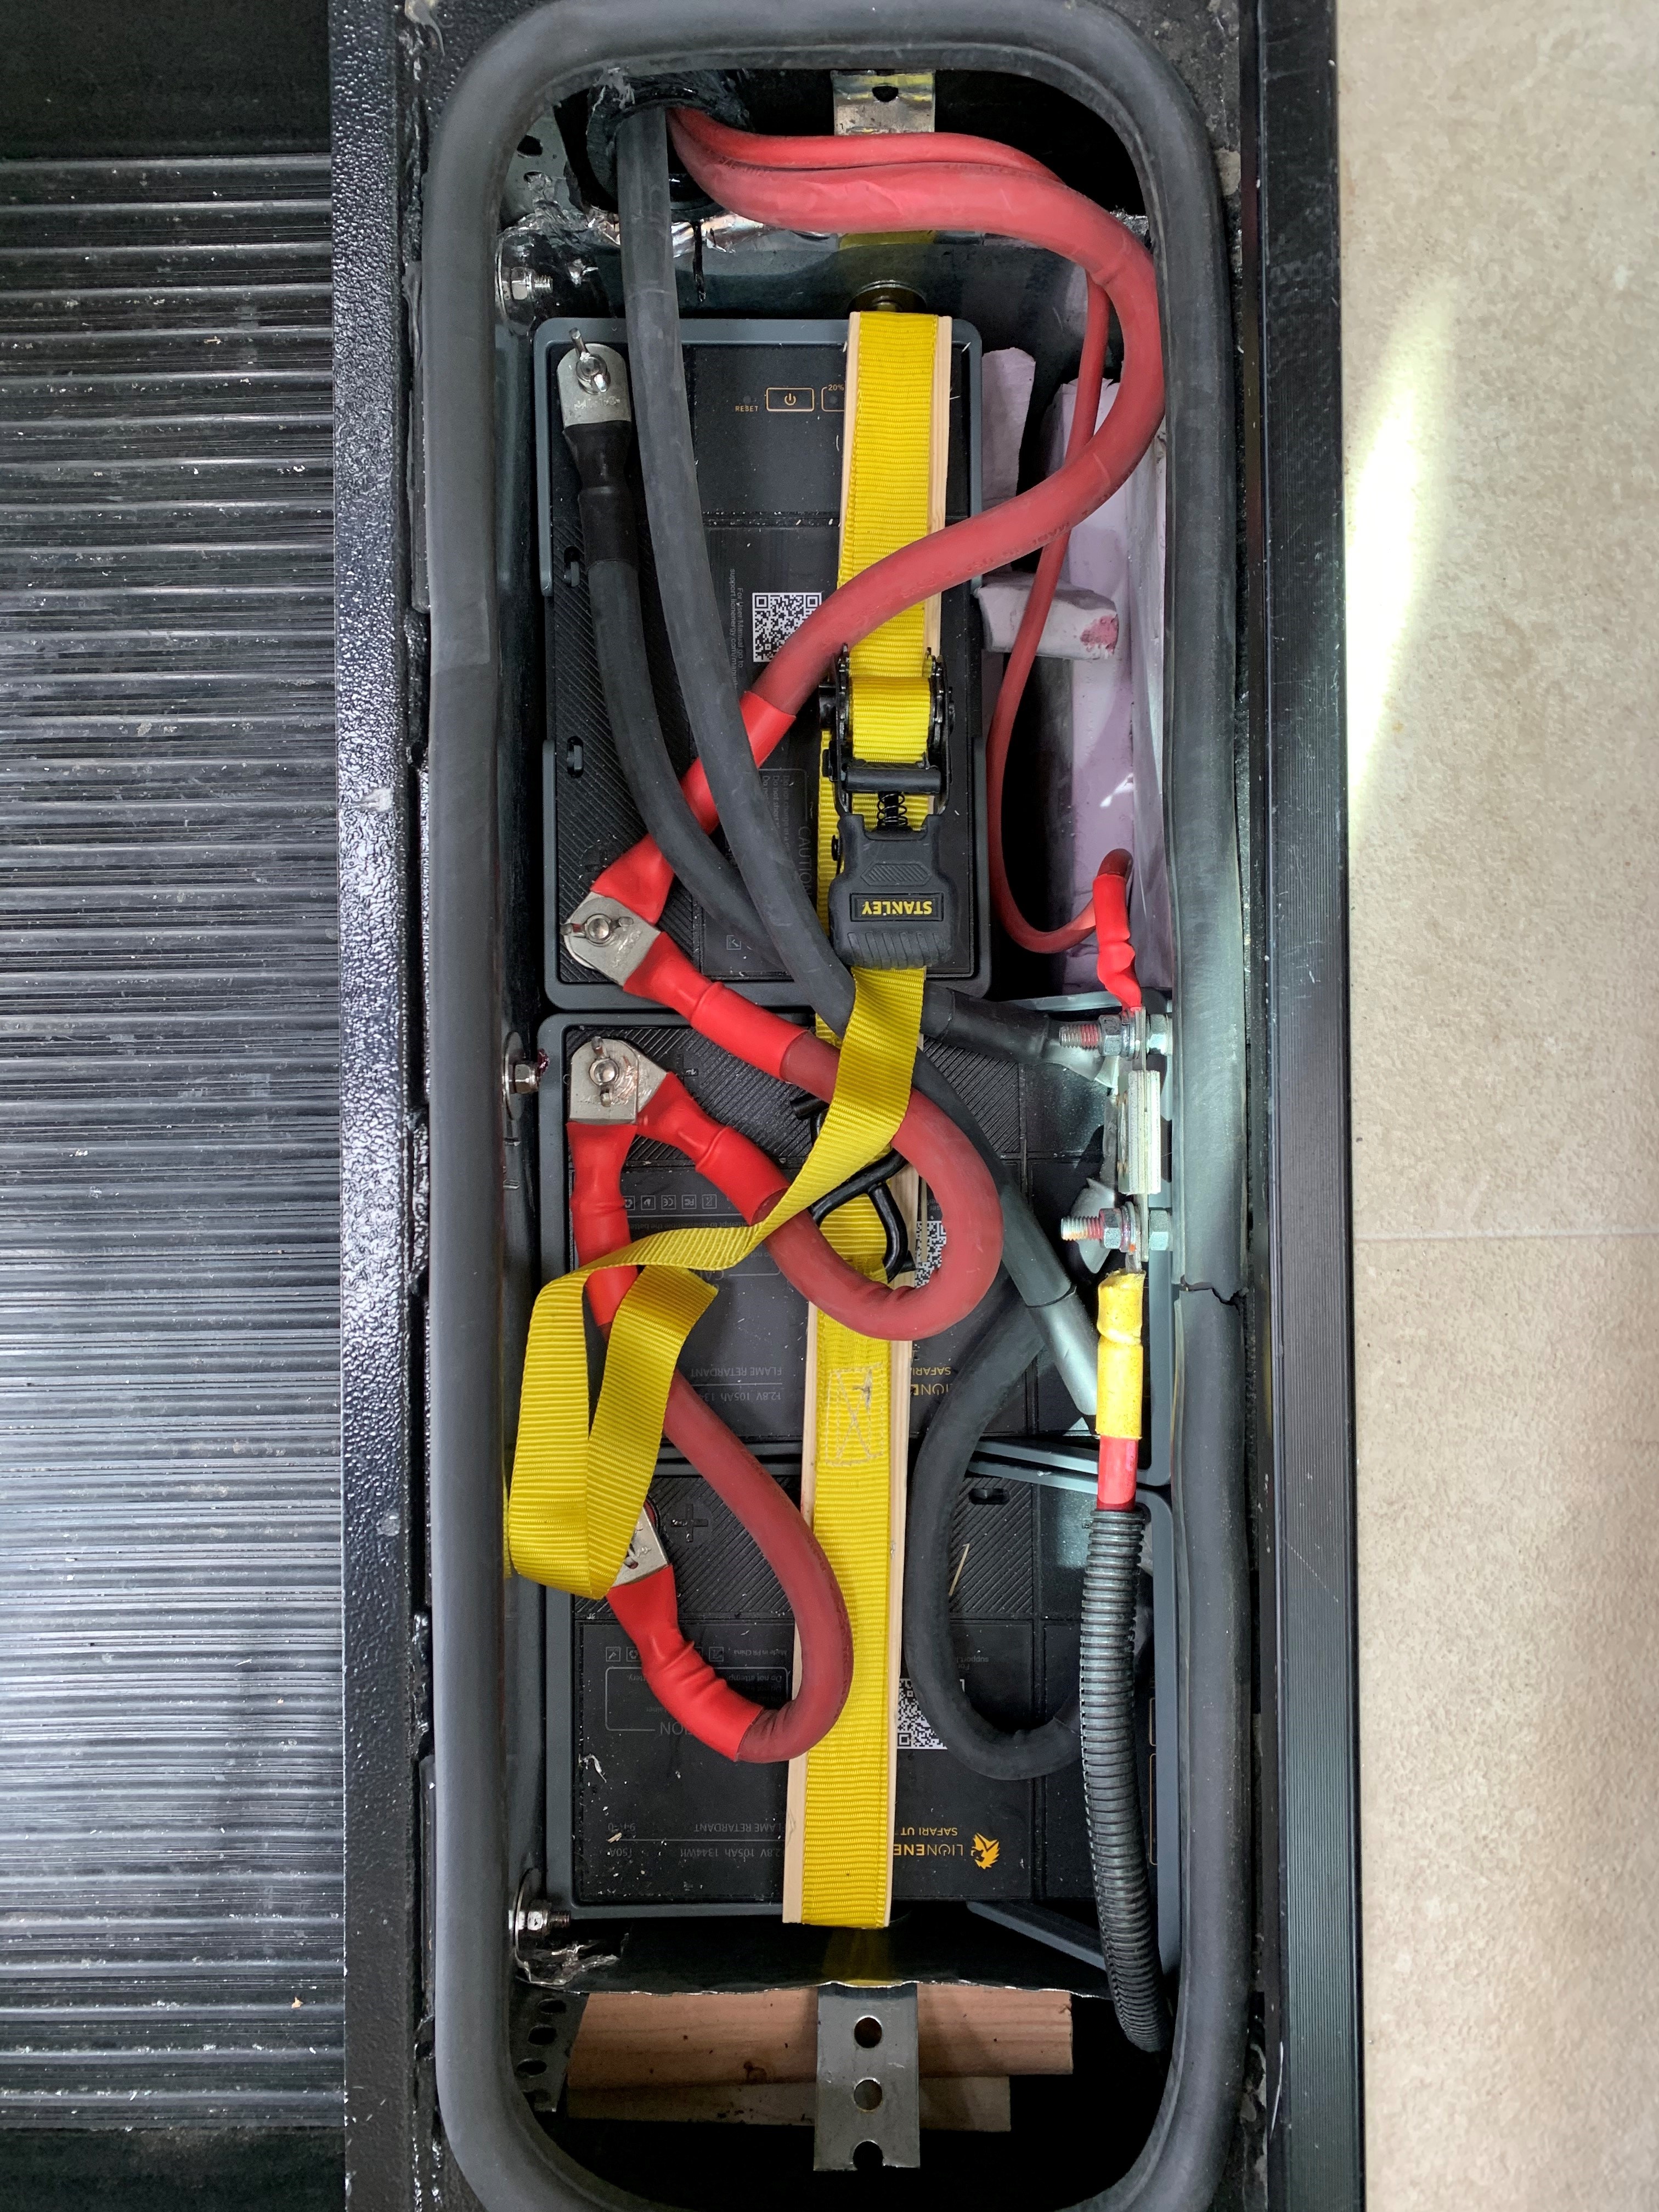 |
I retrofitted the existing battery compartment to fit three (3) Lion Energy Safari UT-1300 lithium batteries. These provide a total of 315 amp hours of power and only weigh about 75 pounds total. The battery compartment is now completely enclosed and insulated on bottom and sides since there is no need for ventalation and they should not get too cold. There is just enough room for the insulation and the batteries! Another benefit to using this space is that if you are in an area below freezing, you can simply remove the top and the heat from the cabin will keep the batteries warm. I removed the old compartment bottom and made a box out of galvanized sheet metal and stainless steel angle. It is bolted to the front of the step and rear frame - solid! If I had it to do over again, I would have cut a door in the front of the step - this would have allowed easy removal access and allowed for a fourth battery (ex: all 4 sitting horizontal).
See Electrical Purchases for more of the parts, tools, etc. |
 |
I replaced the generator "plug" in the power bay that you have to plug the shore power cord into when you want to use the generator with an Automatic Transfer Switch. This allows me to simply start the generator and the switch automatically changes from shore power to the generator and visa-versa. Because the house batteries are no longer connected to the chassis battery, I used the existing wire to feed the DC/DC charger, moved the generator starter power to the new electrical bay (direct connect to the Linx Distributor), and ran a much smaller wire from the Linx Distributor to the awning breaker. I replaced the continuous solenoid with this one. |
 |
The new Victron Multi-Plus Inverter/Charger has a feature called Power Assist. This allows the inverter to produce up to 50amps instead of the original 30amps. Due to this, I replaced the main 110v 30amp supply circuit breaker in the AC/DC distribution panel with a new 50amp one to allow the system to take advantage of this feature. Click on the image to the left for a full resolution diagram showing the new wiring system. |
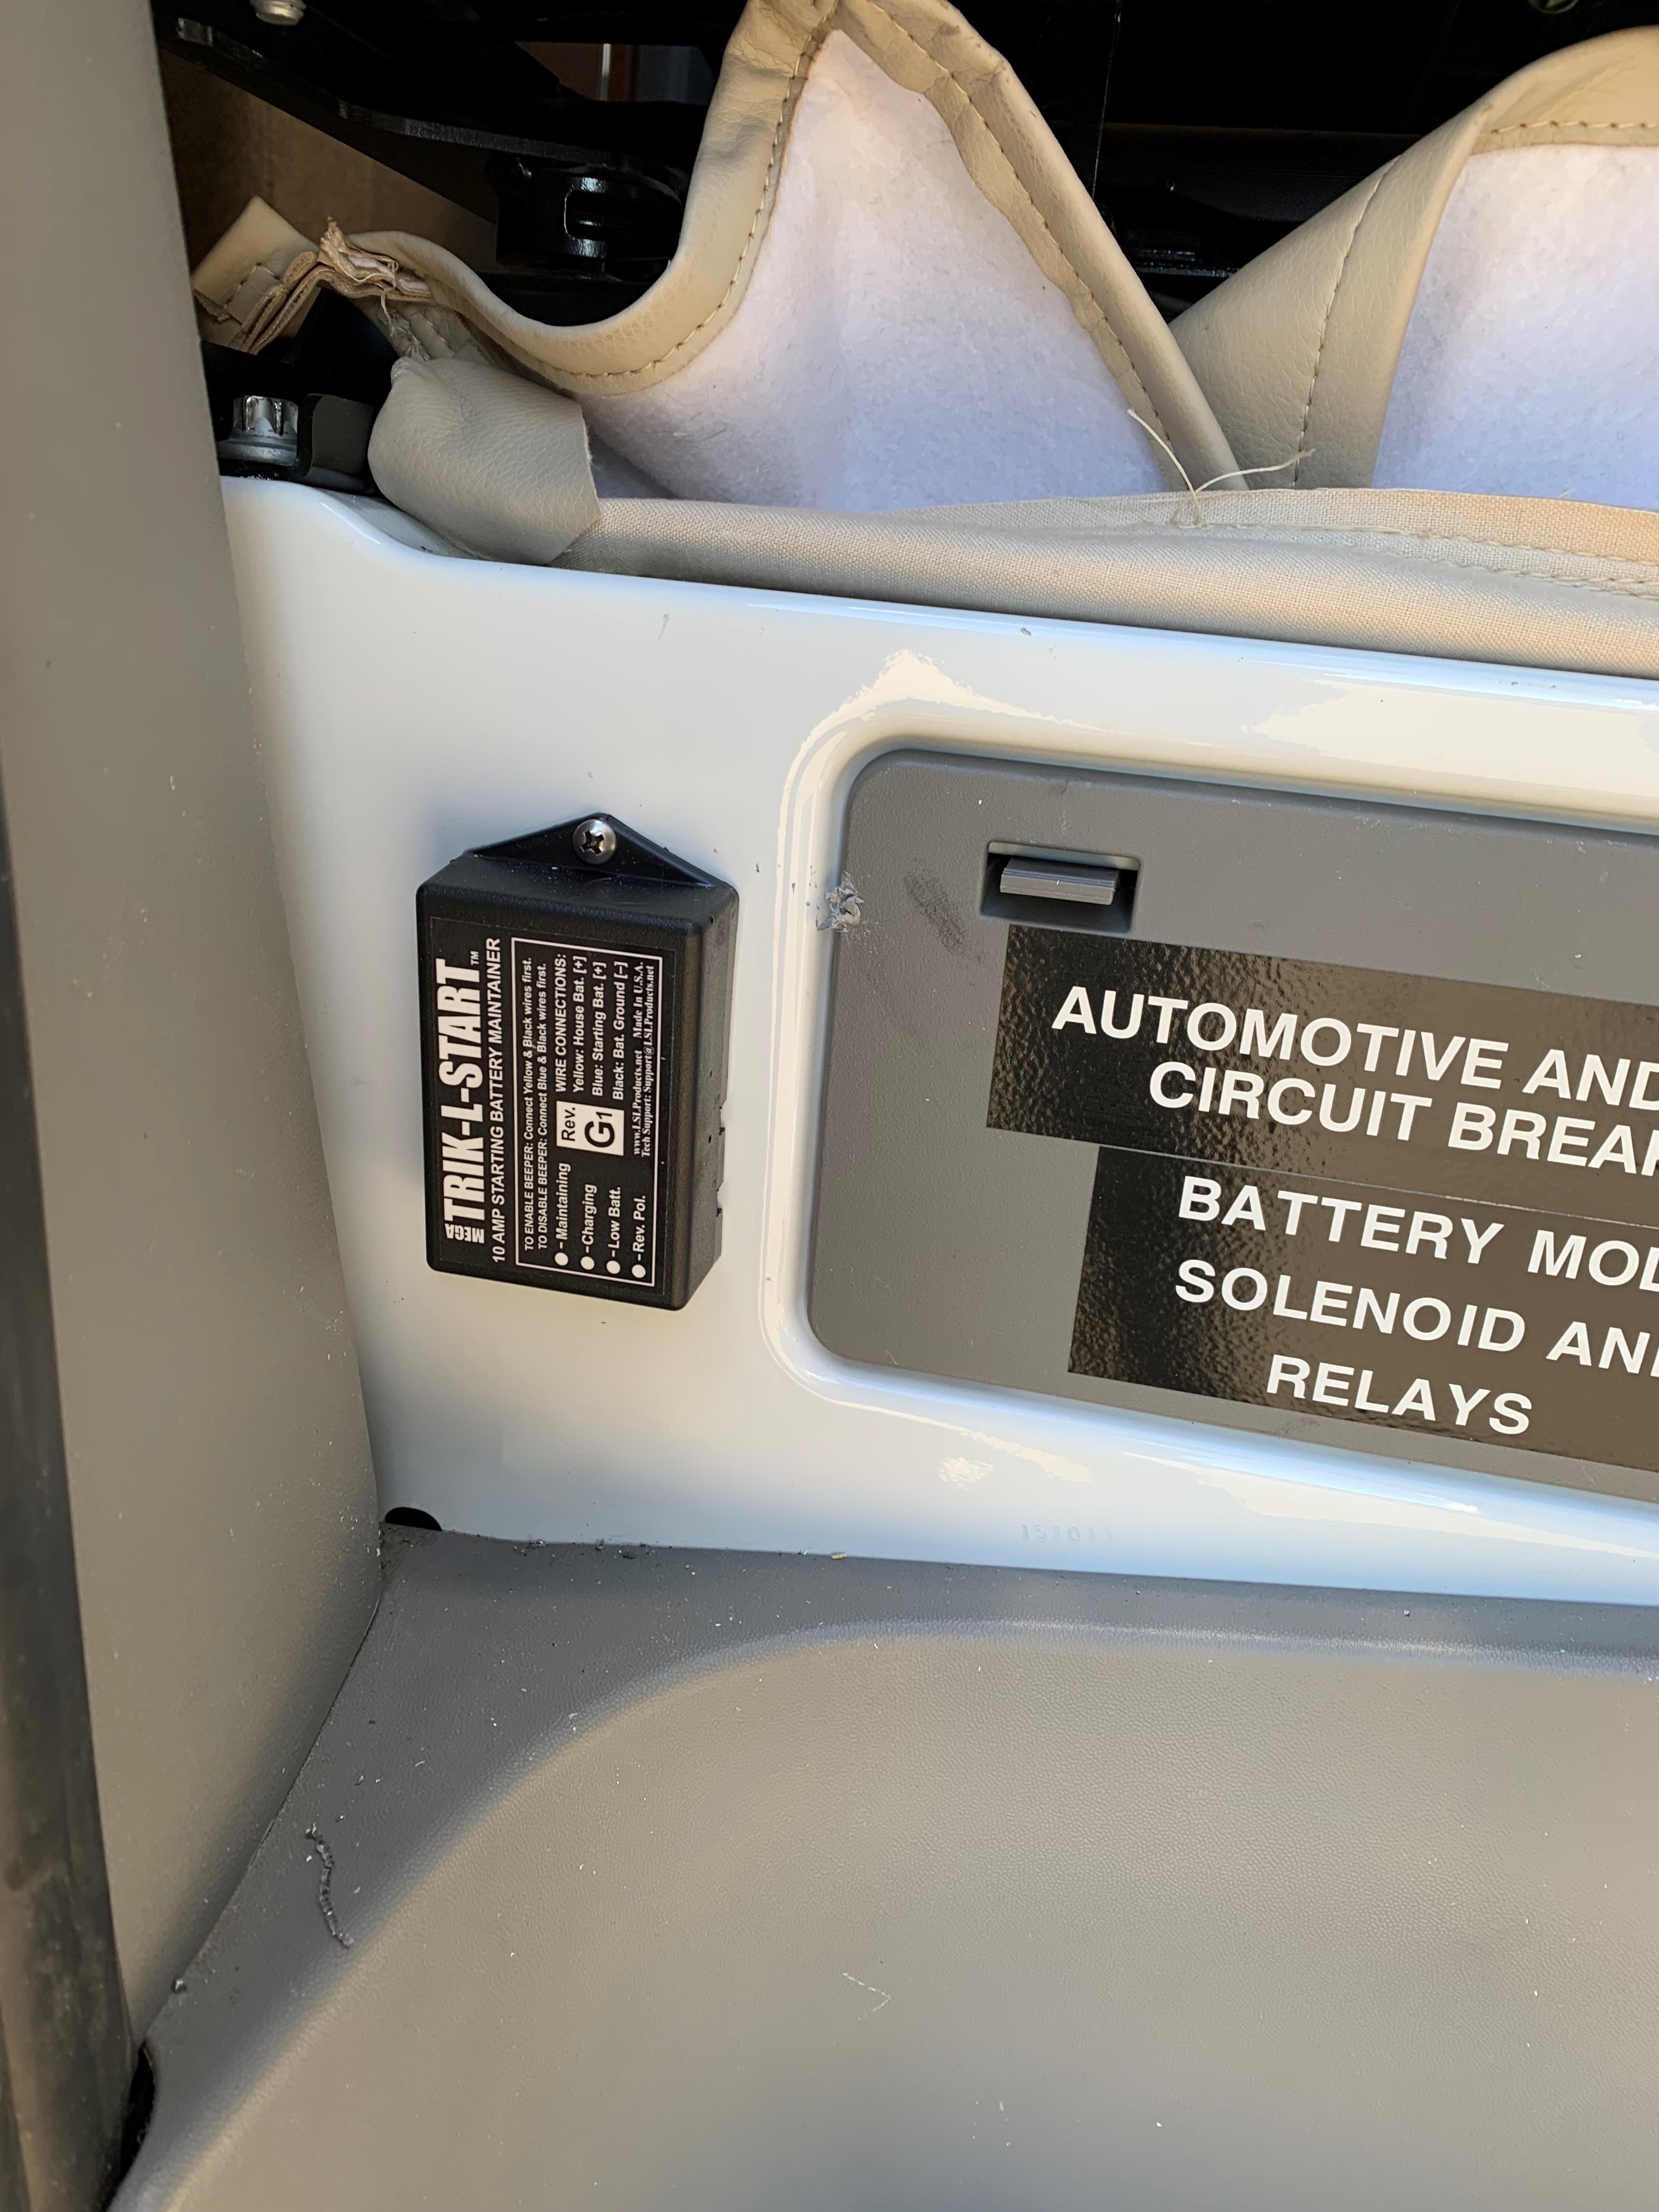 |
I wanted to be able to monitor the system from anywhere over the Internet. I installed the Victron Cerbo GX System Monitor which connects to all the VE.Direct/Bus connections on the other components and makes them available to the Victron App anywhere in the world. NOTE: you must have an Internet connection in the RV that it can connect to. Finally, I installed a Trik-L-Start on the side of the passenger seat and wired it up to a new 15amp 12v breaker that is also fed by the new awning wire and keeps the chassis (starter) battery fully charged and maintained.. |
 |
Because the inverter now supports the entire electrical system, the 3-way fridge can easily drain the batteries over a day or two. This modification provides a 120v power cut off for the fridge if the batteries get below 80% full. Basically, the fridge plugs into this box and it plugs into the 120v outlet. When the Victron Smart Battery Monitor sees that the batteries are below 80%, it will trigger the relay off and thus disconnect the 120v power to the fridge. The fridge then switches over to propane automatically... |  |
When the batteries get above 85%, the relay turns back on - turning the fridge's 120v back on. Love it when things happen automatically! Parts list for the "box": |
SOLAR |
[back to top] |
 |
Electrical phase II complete. 800w of solar! Phase I here (click for the overall wiring diagram) The two REC-Alpha PURE Series 400w panels fit perfectly on the back half of the roof. There is even enough room to walk when necessary. This addition was a bit difficult and time consuming! Difficult because of my back - a lot of up and down the ladders, etc. Time consuming to "noodle" the wires down from the roof to the garage bay and because it seemed that around every corner, I needed a new type of screw, wire, or connector. I picked up the panels a few months before from Northern Arizona Wind & Sun (on my way home from visiting the kiddos) to avoid some steep shipping costs and finally got time to get it done! I can't say enough good things about this company! They helped me through the entire learning and purchasing process and were so kind throughout! |
 |
I used Superstrut channels to mount them using 3M 1-1/2" VHB RP62 tape to affix the channels to the roof. To prepare the channels, I cut down the Gorilla Waterproof Patch Tape (4") to make it 1" wide and 6' long and put it on the inside of the bottom of the channels (to block water from sitting in the holes). Then, applied 3M 1-1/2" VHB RP62 tape in 3 equal sections of 18" long to the bottom of each channel. Once mounted on the roof, I applied Dicor Self-Leveling Lap to both ends of each channel. The solar panels are mounted to the channels with 2" pieces of 1-1/2" aluminum angle. I used 1/4" rivet nuts (WETOLS rivet nut tool) to attach the aluminum angle to the panels and Superstrut nylon strut cone nuts to attach aluminum angle to channels. I used blue Loctite on all the bolts. Makes for a very simple, flexible, and secure mounting structure. I can also install aluminum extensions on one side of the panels to tilt them to catch the winter sun. |
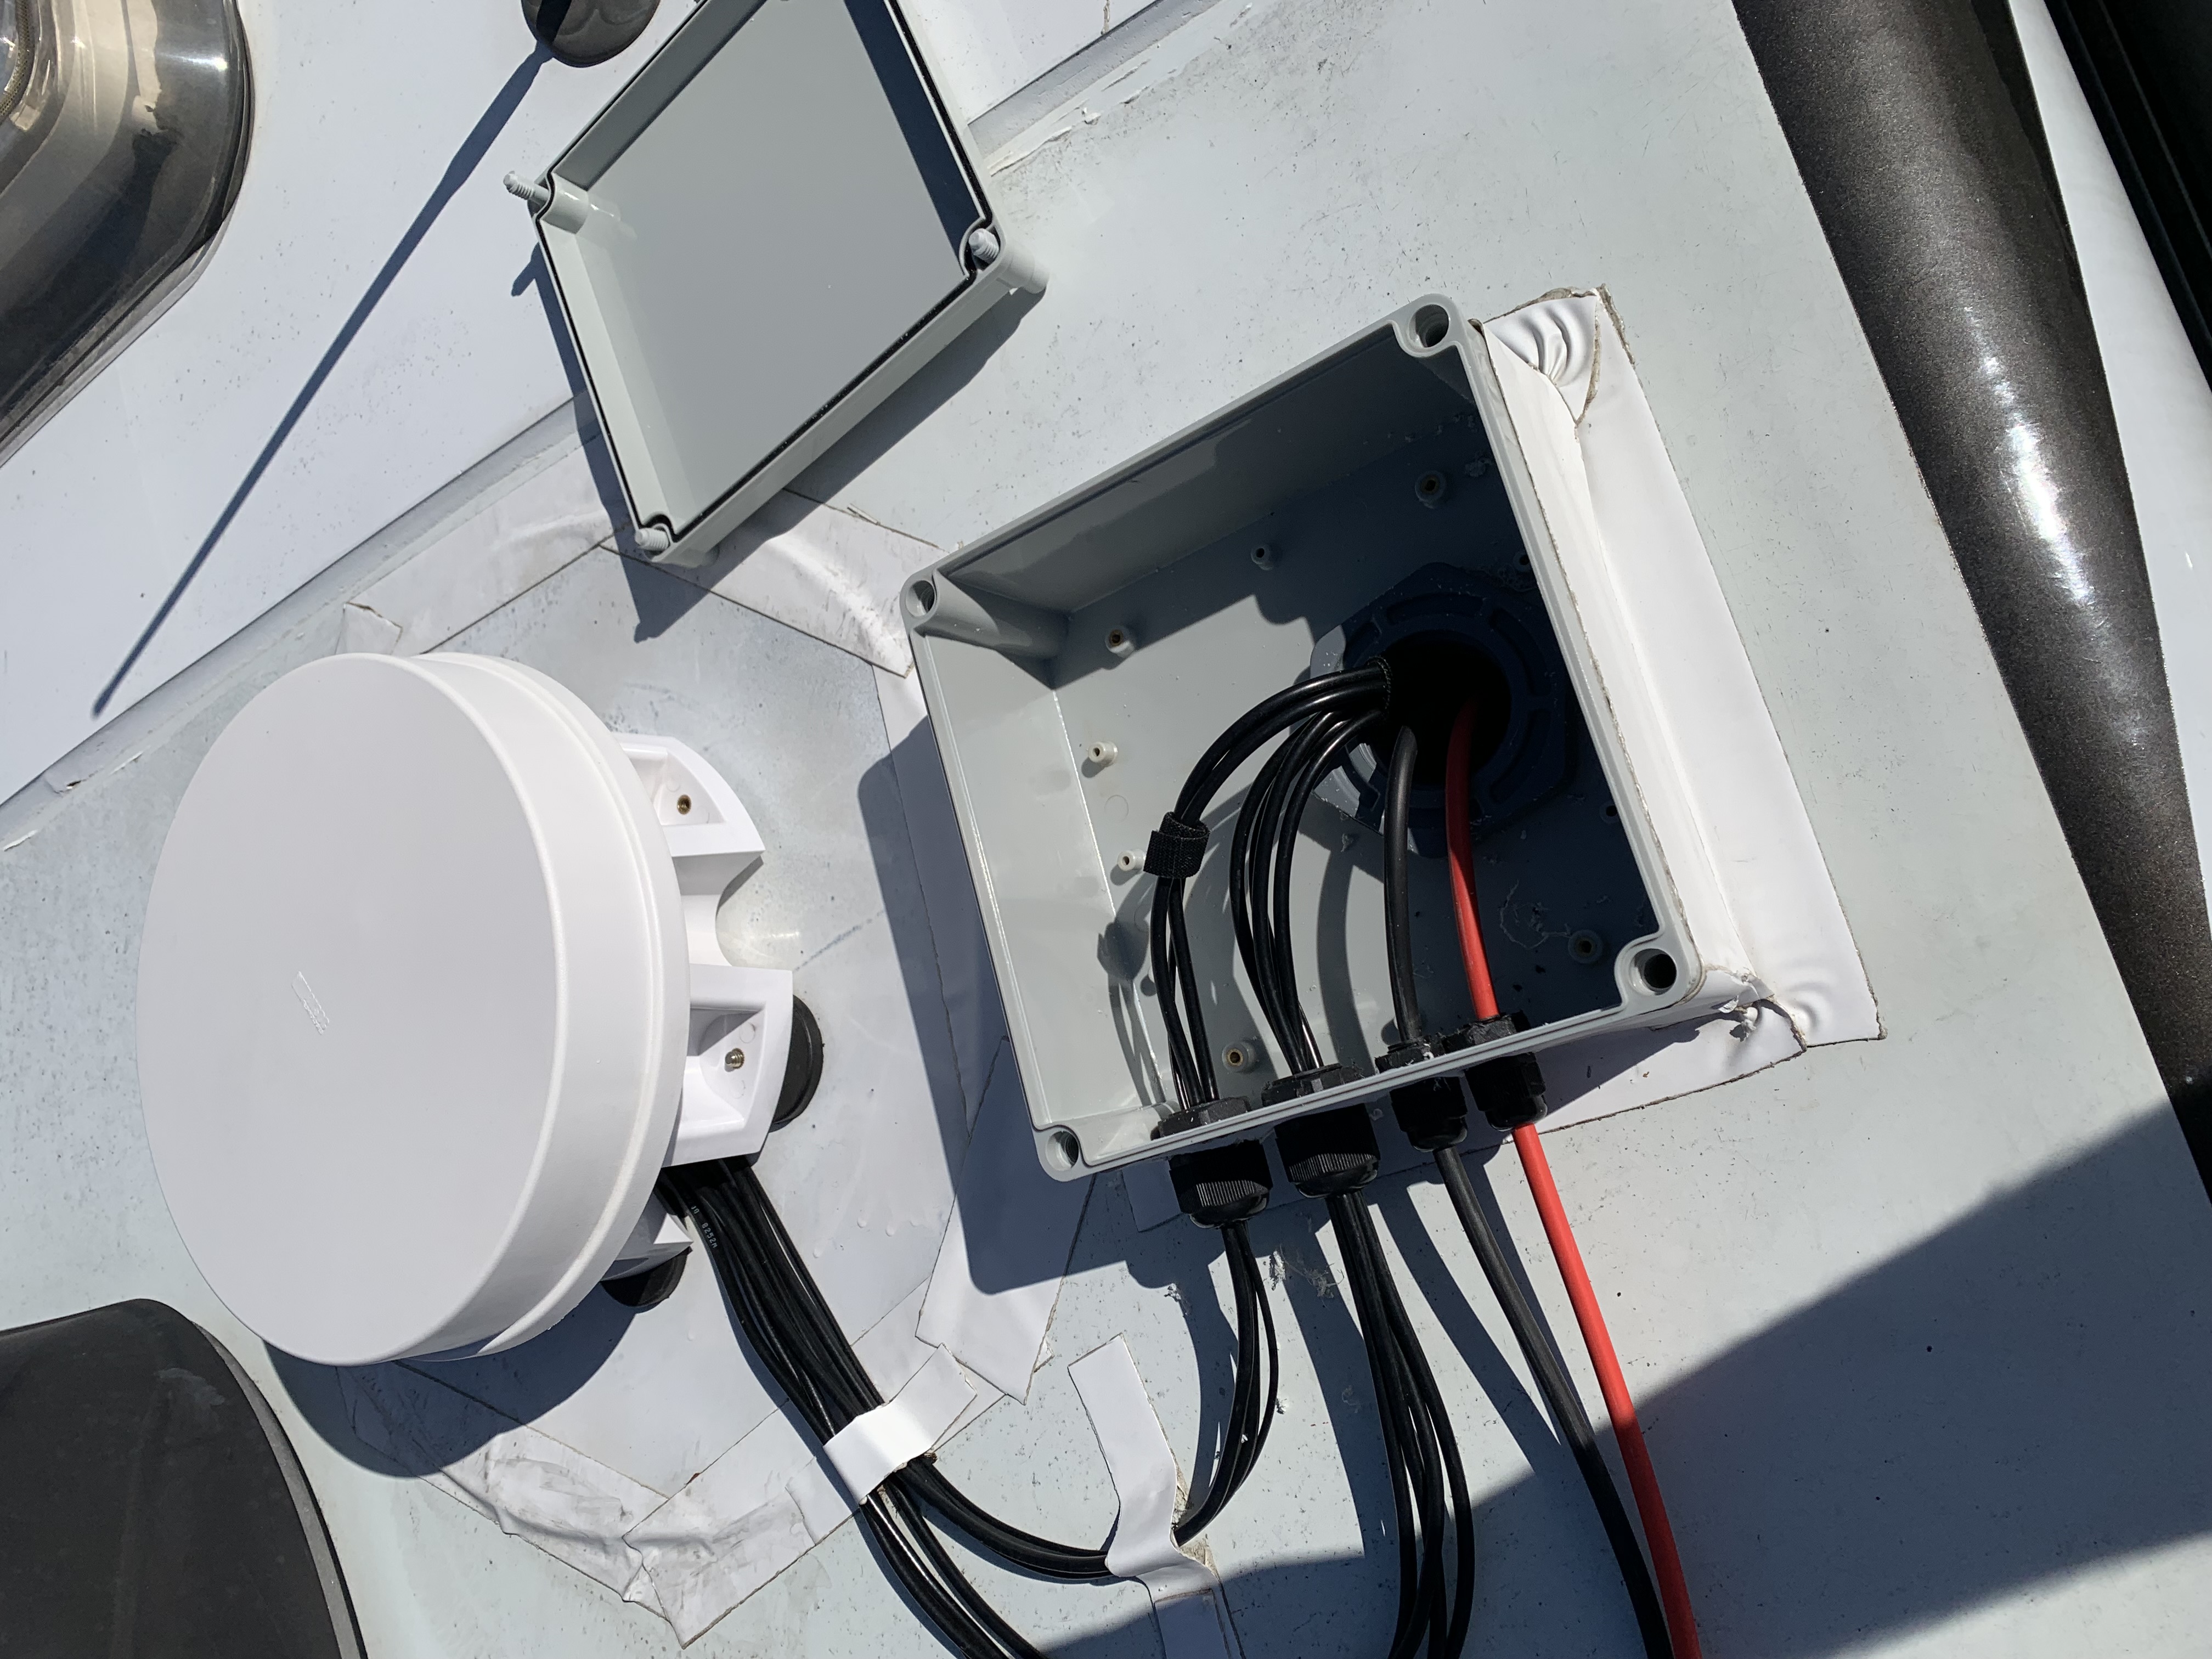 |
NOTE: make sure you cover your panels with cardboard while wiring everything up - these panels run at 48v so you can get a pretty good zap! The panels are wired in parallel with Solar Branch Connectors (Y) and 10 AWG solar extension cable to the Victron 150/85 MPPT Charge Controller. I ran the wires through holes drilled in the channels (side to side), then up the passenger-side channel to the junction box. I made a 2-5/8" hole in the roof with a Diablo hole saw (half from top and half from inside) just above the living area TV cabinet and used a 1-1/2" bulkhead fitting to an IP67 junction box to run all the wires down to the equipment. The access hole is large enough so I could use it for the Parsec Husky Pro 7 external cell antenna cables as well. |
 |
The main DC mini circuit breaker and housing for the solar power is located in the TV cabinet as well. Unfortunately, there is no clean path down to the bay directly in the kitchen wall, so I had to route the power wires over to the OnePlace cabinet above the fridge and down, then back on the floor under the kitchen sink, then into the bay. For me, this was the most time consuming part of the install. Snaking these large wires from the cabinet above the sink to the lower storage bay is frustrating. Take your time! You will want to use a Wire Noodler for this! |
 |
The Victron 150/85 MPPT Charge Controller is mounted in the bay by the front door with the rest of the electrical equipment and wired using 2 AWG pure copper welding cable to the Victron Lynx Distributor. |
 |
I also connected the solar charger to the Victron Cerbo (via VE.Direct cable). This allows me to check on everything electrical from anywhere. As you can see, one of the nice things about having all Victron components is that they all participate. In this screen shot, I have the shore power restricted to 7.5 amps so that the solar panels will add watts, then, I turned on the A/C to full blast. Very nice when everything works as expected! Miscellaneous/Additional Bits and Pieces: |
 |
For those wondering why I only used VHB tape to adhere panels (and other items) to the roof, you can see from this picture of the hole I cut out (for the wire access port), that the roof composition on RVs has nothing for a screw to grab hold of! There are two sheets of 1/8" plywood sandwiching 4" of Styrofoam. See Electrical Purchases for more of the wiring tools, etc. that are needed. |
THERMOMETER |
[back to top] |
 |
I wanted to be able to check temperature and get alerts for temperature anomalies in various parts of the RV. This is especially true for the refrigerator, freezer, and water bay. I purchased this WiFi Weather Station from Amazon. The display has everything I needed and shows all four temperatures at once! Easy modification! I tapped into the 12v power from the RV's Thermostat using a USB Buck converter that converts the 12v +/- to a standard USB power cable that the Weather Station comes with. The Weather Station's phone app allows me to check all the temperatures and receive alerts if the temperature goes below or above whatever I decide for each sensor. |
REFRIGERATOR |
[back to top] |
 |
The last time we were traveling it was hot and the fridge just would not keep up! After looking at all the mods others did, I decided to start with ensuring the back of the fridge had adequate ventilation to remove the heat from the fins. I added two 12v 200mm fans to the upper grill to move air from bottom to top. The little computer fan back there that comes stock is completely inadequate! Easy modification! These fans have high and low speed. I decided on high since I hooked them up through the existing temperature switch on the fins (the one that turns on/off that little computer fan) and, even on high speed, they are silent. I then used 50lb zip ties to fasten them to the inside of the grill. I had to drill the existing holes in the fans slightly larger so the zip ties would fit. |
 |
For the 12v power, I tapped into the wires using T-Tap Wire Connectors for that existing computer fan and its temperature switch. I just used 18/2 standard thermostat wire for everything. I left the computer fan there and connected - too hard to remove and it does provide a very slight bit of airflow upward across the heat-fins. Now, when it gets hot, the three fans turn on automatically and cool it down fast. I've had this out in 90+ degree weather and it works great! the fridge and freezer maintains acceptable temperatures. |
 |
There is no need now for internal fridge fans, however, I may still add one just to keep places in the fridge from freezing. This is also a good time to add the vent screws to keep the grill/covers on. On mine, there were existing screws under the grills in exact center on left and right (not sure why they didn't do this from the factory). Simply mark where the holes are on the grills, drill a hole, and use some #8 stainless steel screws. Easy and no more worrying that we'd lose them! |
WATERBAY |
[back to top] |
 |
In my RV there was a hidden bay door where the grey tank is. It had a full door with hinges. Just had to add the strut and latches. Added a gas strut to the door so it will stay up when needed. A couple of spring latches to keep closed and a piece of 2" aluminum angle to have a bottom. Then three hose racks attached to 2" holed stainless strap hooked onto the existing grey tank strap. |
 |
Here is a close up of the door latches |
 |
The existing water bay with pressure regulator mounted and plumbed in and a bullhead connector over to hidden bay. Utilized a couple of 90 degree brass elbows to avoid kinking in the tight space.
|
SEWER |
[back to top] |
 |
My black tank valve was leaking and needed replacing. I decided to replace both the 3" Bladex Valve and the 3" Flexible Coupler which was also showing signs of wear and cracking. This is the 3" slip hub if you need one. Make sure to add a little Loctite to the threads on on all screws when replacing - you do not want this to come lose! We normally do not have the drain connected unless we are dumping, so I decided to raise the drain a bit so it wasn't as close to the ground (more horizontal) - works great and less likely to get struck by debris from the road! Very easy, but messy job. Make sure you have a good bucket, plastic gloves, and a water hose near by. |
 |
I've not had any problems with this setup before, but I was concerned that there were no support straps on the drain structure. I added a 3-1/2" Split Ring Hanger Strap with 3/4" Galvanized Hanger Strap to tie it to the upper tank frame. |
RECLINERS |
[back to top] |
 |
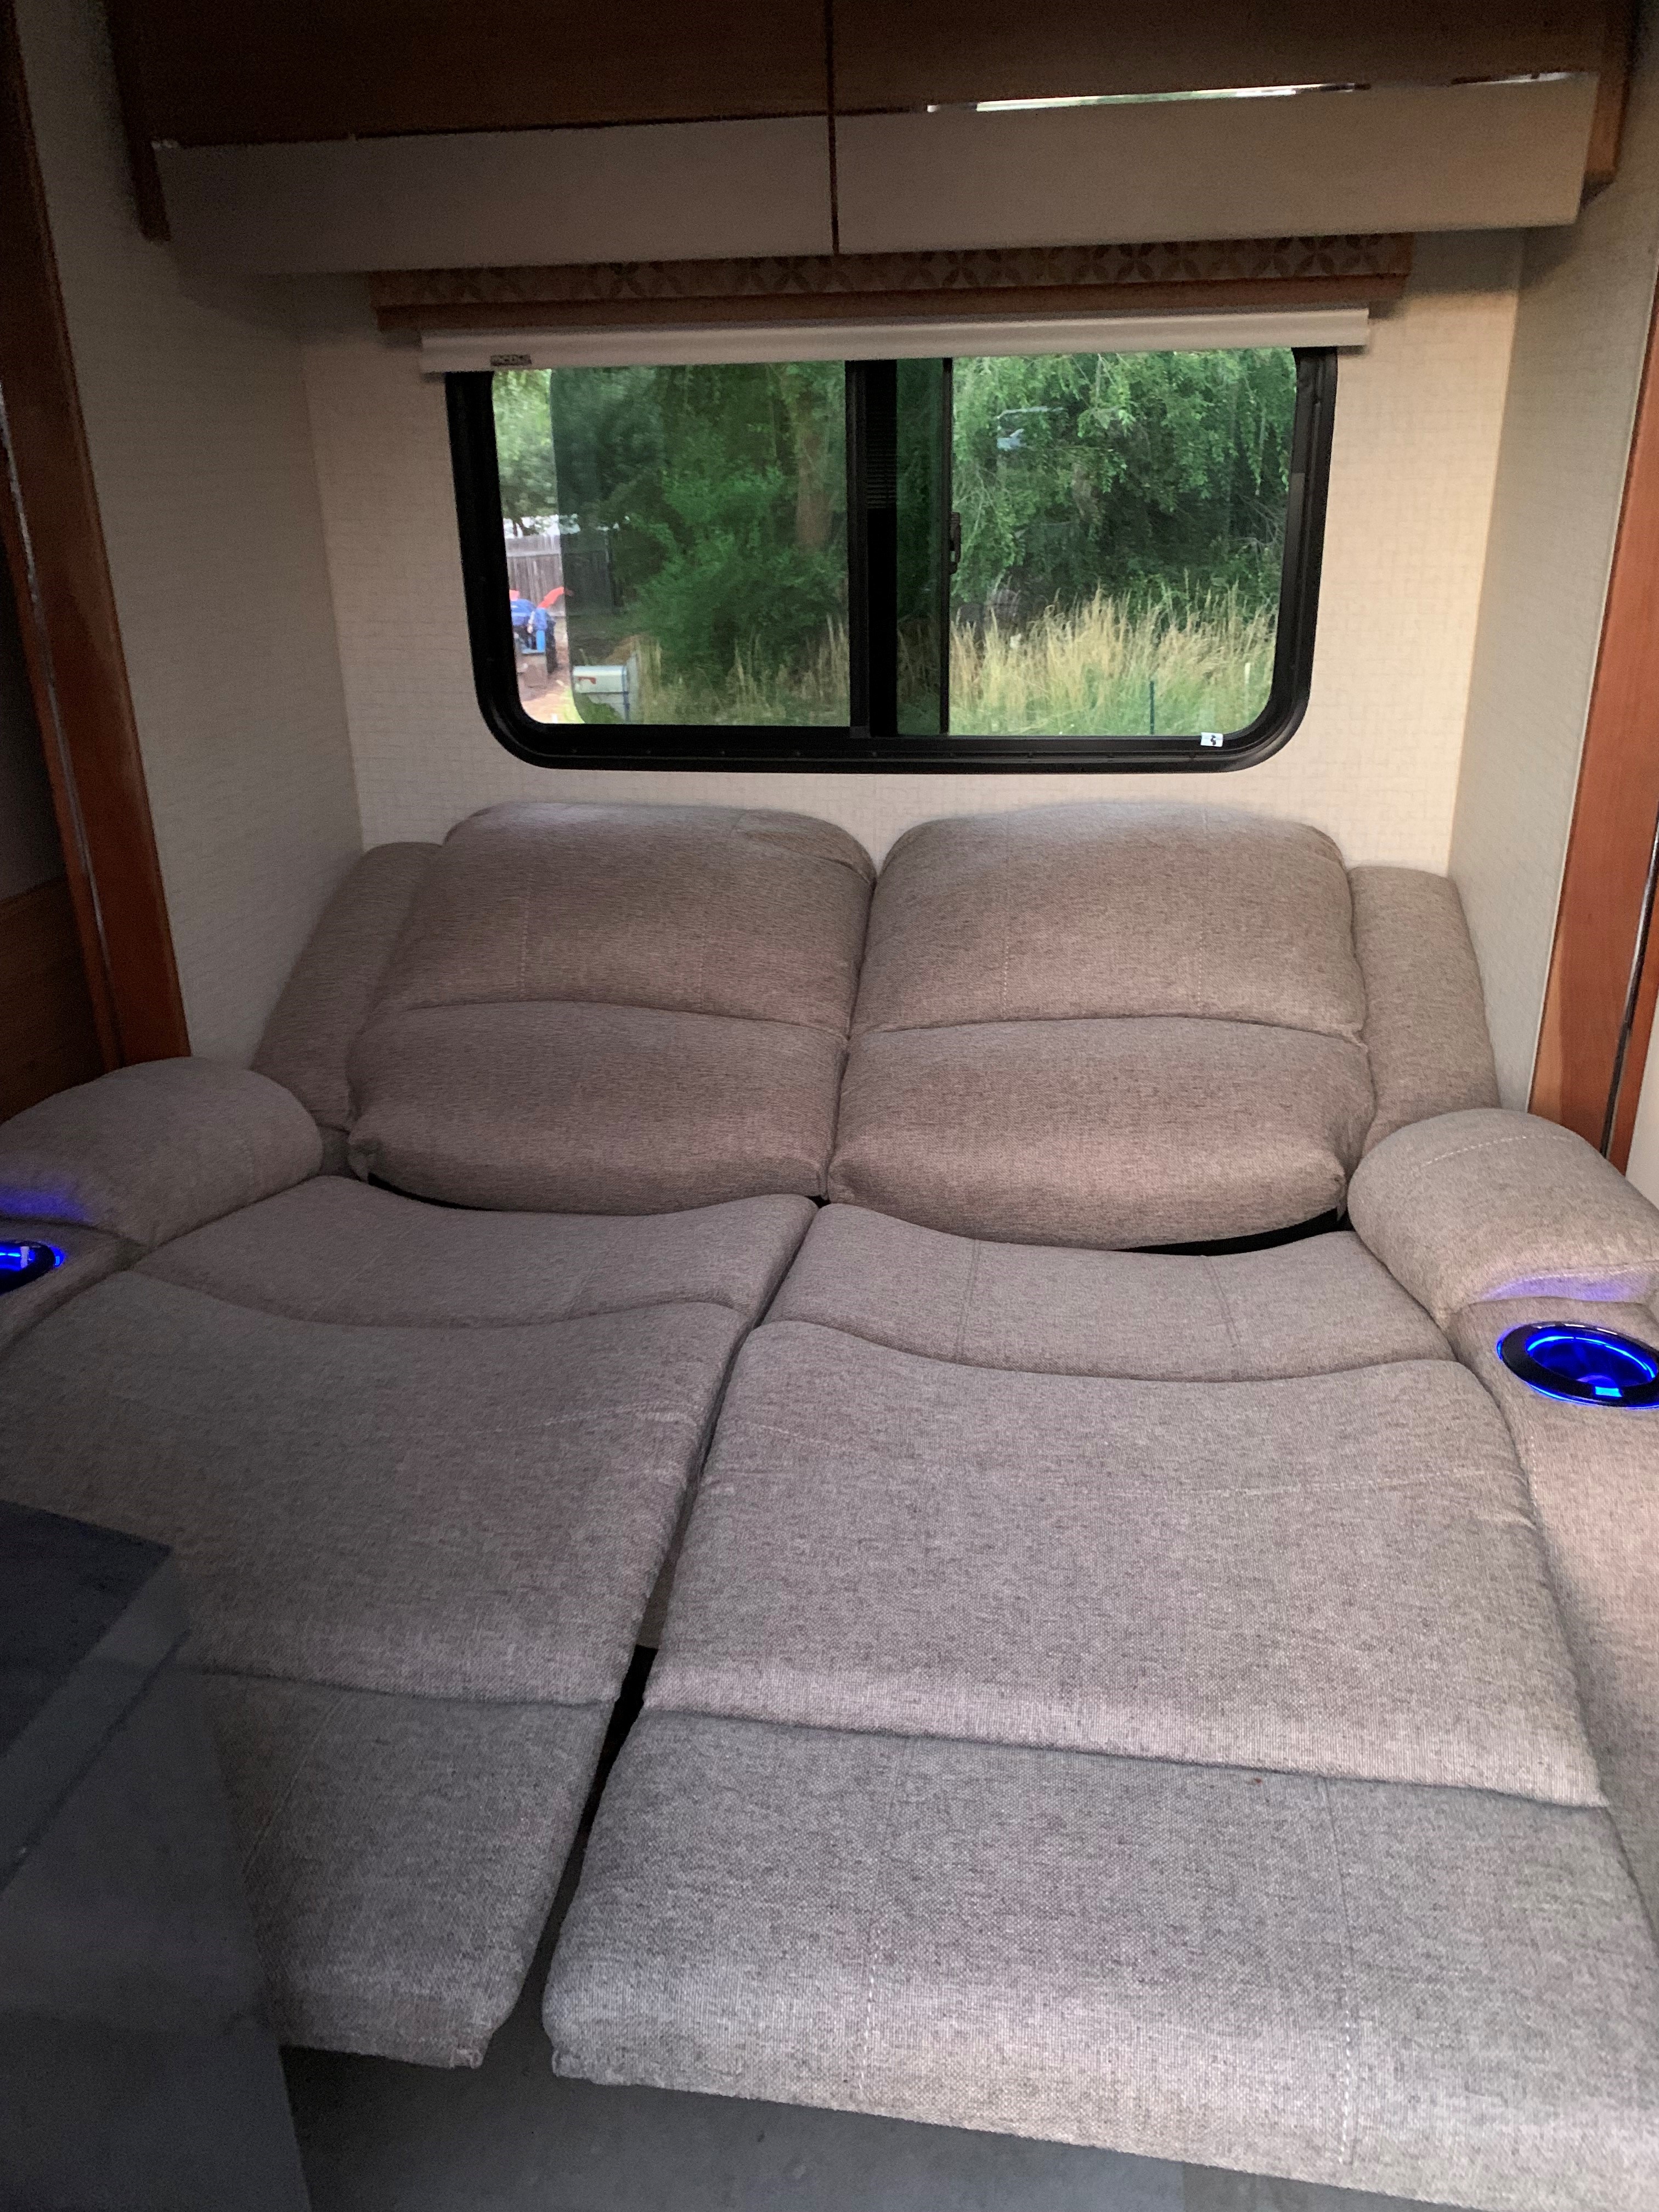
The stock sofa bed in the slide is horribly uncomfortable. RecPro makes a set of electric recliners that fit perfectly and are extremely comfortable! They require 120v power, so I ran a line from the inverter to the slide and installed a recessed outlet on the floor of the slide replacing the small access panel cover. Then, possitioned them where I wanted leaving about 3-4 inches from the wall to allow for the recline position and, with the slide out, drilled two holes each through the slide floor. Zip tied all the wires and used carriage bolts from the bottom up to secure the recliners. It is important to use carriage bolts and to position them upward so that when the slide goes in and out, they do not scratch the floor. |
|
I then got a quality piece of wood (1x4) and stained to match - applied Verathane clear to protect it. I used small "L" brackets facing each other on the back in four places to secure it to the recliner's frame, used a pipe insulation to prevent rattling and zip tied them to the recliner frame. These are the RecPro Charles 58" Powered Double RV Wall Hugger Recliner Sofa in cloth (Oatmeal color). Here they are fully reclined. Even with the slide IN, they fit perfectly! These are so comfortable and such a huge improvement over the sofa bed! |
LARGE DRAWER |
[back to top] |

|
There is a fairly wide-open space under the fridge with enough space for a decent sized pots and pans drawer! The first task is to remove the panel. Do this gently because you will need it for the drawer face. This is by far the most frustrating part of the entire project, so take a lot of breaks! You are working with one arm in a very confined space removing the four rear screws and it is important that this panel not get chipped, marred, etc. |

|
Once the panel is removed, you need to tie back all loose wires and piping so that the drawer will not rub on them. Give everything a good vacuum. | 
|
Next, build the drawer box. The opening on mine is: 21-1/4"w x 10-3/4"h x 20"d and the glides are 18"d x 1/2" wide each. So, I used 1/2" x 20-1/4w x 10-1/4"h for front/back, 1/2" x 19"d x 10-1/4"h for sides, and 1/4" x 19"d x 20-1/4"w for bottom. I decided to use prefinished PureBond maple panels - this made it very simple - no finish required! Use a table saw to cut to size. These panels are available at Home Depot - sides and bottom. I used Gorilla Wood Glue on all touching edges and 1" black stainless wood screws at each corner of the sides and bottom, then use a brad nailer to add additional nails to the bottom about every 4". The top edges of the box are unfinished, so I used some maple pre-finished 3/4" veneer edge banding. You are supposed to use an iron, but my wife was having nothing to do with that! So, I used a heat gun and that worked perfectly (maybe even better). Trim with a sharp utility knife. Then, sand all the edges and corners with 220 grit being careful not to scratch the pre-finished wood. |

|
The next step is to mount the drawer glides - these glides are 100 pound capacity, full extension (so you can see the entire contents of the drawer when extended), and soft closing. I didn't measure completely accurate, so I had to use some plastic shims to bring the drawer and glides to the proper alignment. Nothing major and works perfectly. | 
|
Once the box is complete, mount the original panel to the front of the box with 3/4" wood screws (from back), mount the drawer pull, and mount two catch magnets on either side of drawer - you can also use the normal RV latches, but those always seem to break for me, so I decided to try these. So far, so good. | 
|
All in all, a very worthwhile project! Gives a bit of extra storage space and only took a few hours. |
CHASSIS |
[back to top] |
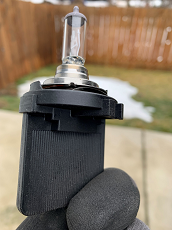 |
LED Headlights: The old headlights in the Sprinter leave a lot to be desired! I wanted to replace them with LED, but had a bear of a time finding LED replacements that would just fit without any additional brackets, etc. The image to the left is one of the old bulbs in the existing twist-on bracket. I finally found a company that makes direct replacements for the 2016 Sprinter AUXITO 2023 Upgraded H7 LED Bulbs. I purchased two sets of two - two for the low-beams and two for the high-beams. Very simple modification that took about 20 minutes for all four. Simply remove the headlight canister cover from inside the engine compartment. Both low and high beam bulbs are in there. DO NOT USE FORCE! Twist the old bulb's bracket out and pull towards the back - REMEMBER the orientation of the bracket - you cannot see it when you're doing this. Unplug the bulb from the bracket paying attention to the orientation of the old bulb and replace with the LED bulb. Carefully put the bracket with the new bulb back into the canister and do the next one. What a HUGE difference! And, no additional adjustments needed. |
 |
The stock Mercedes Sprinter horn sounds like a bicycle horn. These PIAA Superior Bass Horns make it sound much more like a proper truck horn. Very simple mod. Remove front grill. Remove existing horn on left, tee off existing wires and run two wires (pos/neg) in wire loom across to right side. Attach both horns (right and left) using a single screw in each. |
 |
For those of us without automatic levelers, this is an inexpensive mod that I've found makes it so much easier. Just open the door and really easy to see while positioning! Affix the Bubble Levels to the fuel door and chassis with some Clear VHB tape. Obviously, make sure you're level when installing - I found that my local gas station pump pads are perfectly level. |
BEDROOM |
[back to top] |
 |
My wife was complaining that I stayed up working too late while she was trying to sleep. This, surprisingly, completely solved the light and sound problem. Simple spring loaded curtain road, a larger "foot" for the curved side of the wall, a Command Hook and magnetic wrap cord for while we're driving, and a set of black-out and sound dampening curtains. For the curved side of the wall, remove the rod's foot and use the larger one. On the cabinet side, the rod's existing foot works perfectly and is small enough to allow the closet doors to open without moving it! Bonus, the fan is perfect for sleeping! Overall, took just an hour! |
SHOWER |
[back to top] |
 |
The stock shower head leaves a lot to be desired. This is especially true when trying to conserve water. In an RV, the cold water has slightly more pressure than the hot water side, so when you shut off the water at the shower head, the cold water pushes out the hot water. So, when you turn it back on, FREEZING! To avoid this, I added a back-flow preventer valve to the hot water side of the water valve on the wall to prevent the cold water from being able to push the hot water out. I replaced the stock shower head with the Oxygenics RV shower head and replaced its on/partial-off valve with a true on/off valve which will completely shut off the water while lathering up. Finally, I added Double Wall Mount Shampoo/Soap Pump Dispenser to the right of the shower head. It affixes to the shower wall with supplied VHB tape. This works perfectly and gets rid of all the bottles in the shower. |
WORKSTATION |
[back to top] |
 |
I have the blessing of having a job that I can work from anywhere. One of the benefits of owning the RV is it makes it easy to work from anywhere because of the space and quality Internet (see Internet Service and Setup that I use). One of the challenges of this size of RV is there is not a lot of space for an "office". The best solution I've found is a storable table and second monitor stand. |
 |
I decided to install these for the driver's seat so that they would not be in the way of the door or the recliners when I was working or when they were stored. With the driver's seat swiveled around and raised up, it makes for a perfect work area that is mostly out of the way and with a clear view to the rest of the RV. |
 |
Installing was a bit of a challenge. I had to install some additional wood behind the plastic trim side cover. I removed the plastic trim - there are existing wood pieces going up the height of the side, but not wide enough, so I added additional wood pieces to make it wide enough to hold the table stand's mount. While you have the trim removed, check behind the panel, there are wires that go down the height of it that, in my case, were not tied down and were making annoying noises while driving. Secure these with some velcro straps (finally, no more banging!). Since the wall is not exactly vertical, I made a wood shim that is tapered (white piece of wood shown in the picture to the left) so that the table stand's vertical arm will be plumb. I used 3" lag screws to mount the bracket. |
 |
As you can see from the picture, it folds up nicely while driving - completely out of the way. I just remove the wood table top and place it on the carpet behind the driver's seat, then put my laptop bag on top of it - stays put! Parts for swing-table: - RV Adjustable Table Leg Bracket - RV Removable Laptop Table - 3" Stainless Lag Bolt Screws Parts for second monitor: - Flexible Tablet Holder with Arm and Mount - 4" Swivel Arm - 6" Double Socket Arm - 1" to 1" Ball Adapter - Portable Monitor Additional items: - Flat Plug Extension with Outlets and USB Power to run power from the plug on the other side of the recliners to the workstation. - Portable Web Cam - 10' USB C Cable to run from computer to second monitor. |
CAB |
[back to top] |
 |
If you have the built-in night shades in the cab, you know the pain that comes after a long drive resting your arm on the door window. A quick, easy, and very effective fix for this is to buy a pool noodle with a slit down the center. Simply push it onto the frame of the night-shade and done! |
 |
The Garman 57 Dashcam is a very worthwhile piece of equipment to install. It does all the normal things like take videos when it detects a crash about to occur, wifi, GPS, etc. However, it has some pretty cool additional features too - voice activated, time lapse videos of your trip, lane departure warning, following too close warning, etc. The first thing to do is to remove the existing rear mirror holder from the windshield. Be very careful while doing this. Do this in the heat of the day with the sun baking the windshield. I used a heat gun and pair of vise grips. carefully attach the vise grips to the holder and heat up the holder. Do not force it, you will crack the windshield - just use very light pressure (ask me how I know :( ). After you have removed the old holder and allowed the windshield to cool, use some denatured alcohol and clean the area well. Attach the baseplate for the dash cam in the center. |
 |
Noico cab sound proofing. Easy addition, but took a bit of time. I struggled a bit with finding the screw holes, then came up with a solution - use small rivets! Just drop in the existing screw holes then lay the sound proofing over it and push through, razor blade cut around the rivet and pull it out. So much easier! Once you are finished cutting and placing, make sure you roll it down with a Seam Roller. If you do work on the roof using EternaBond, this tool is great for that too! |
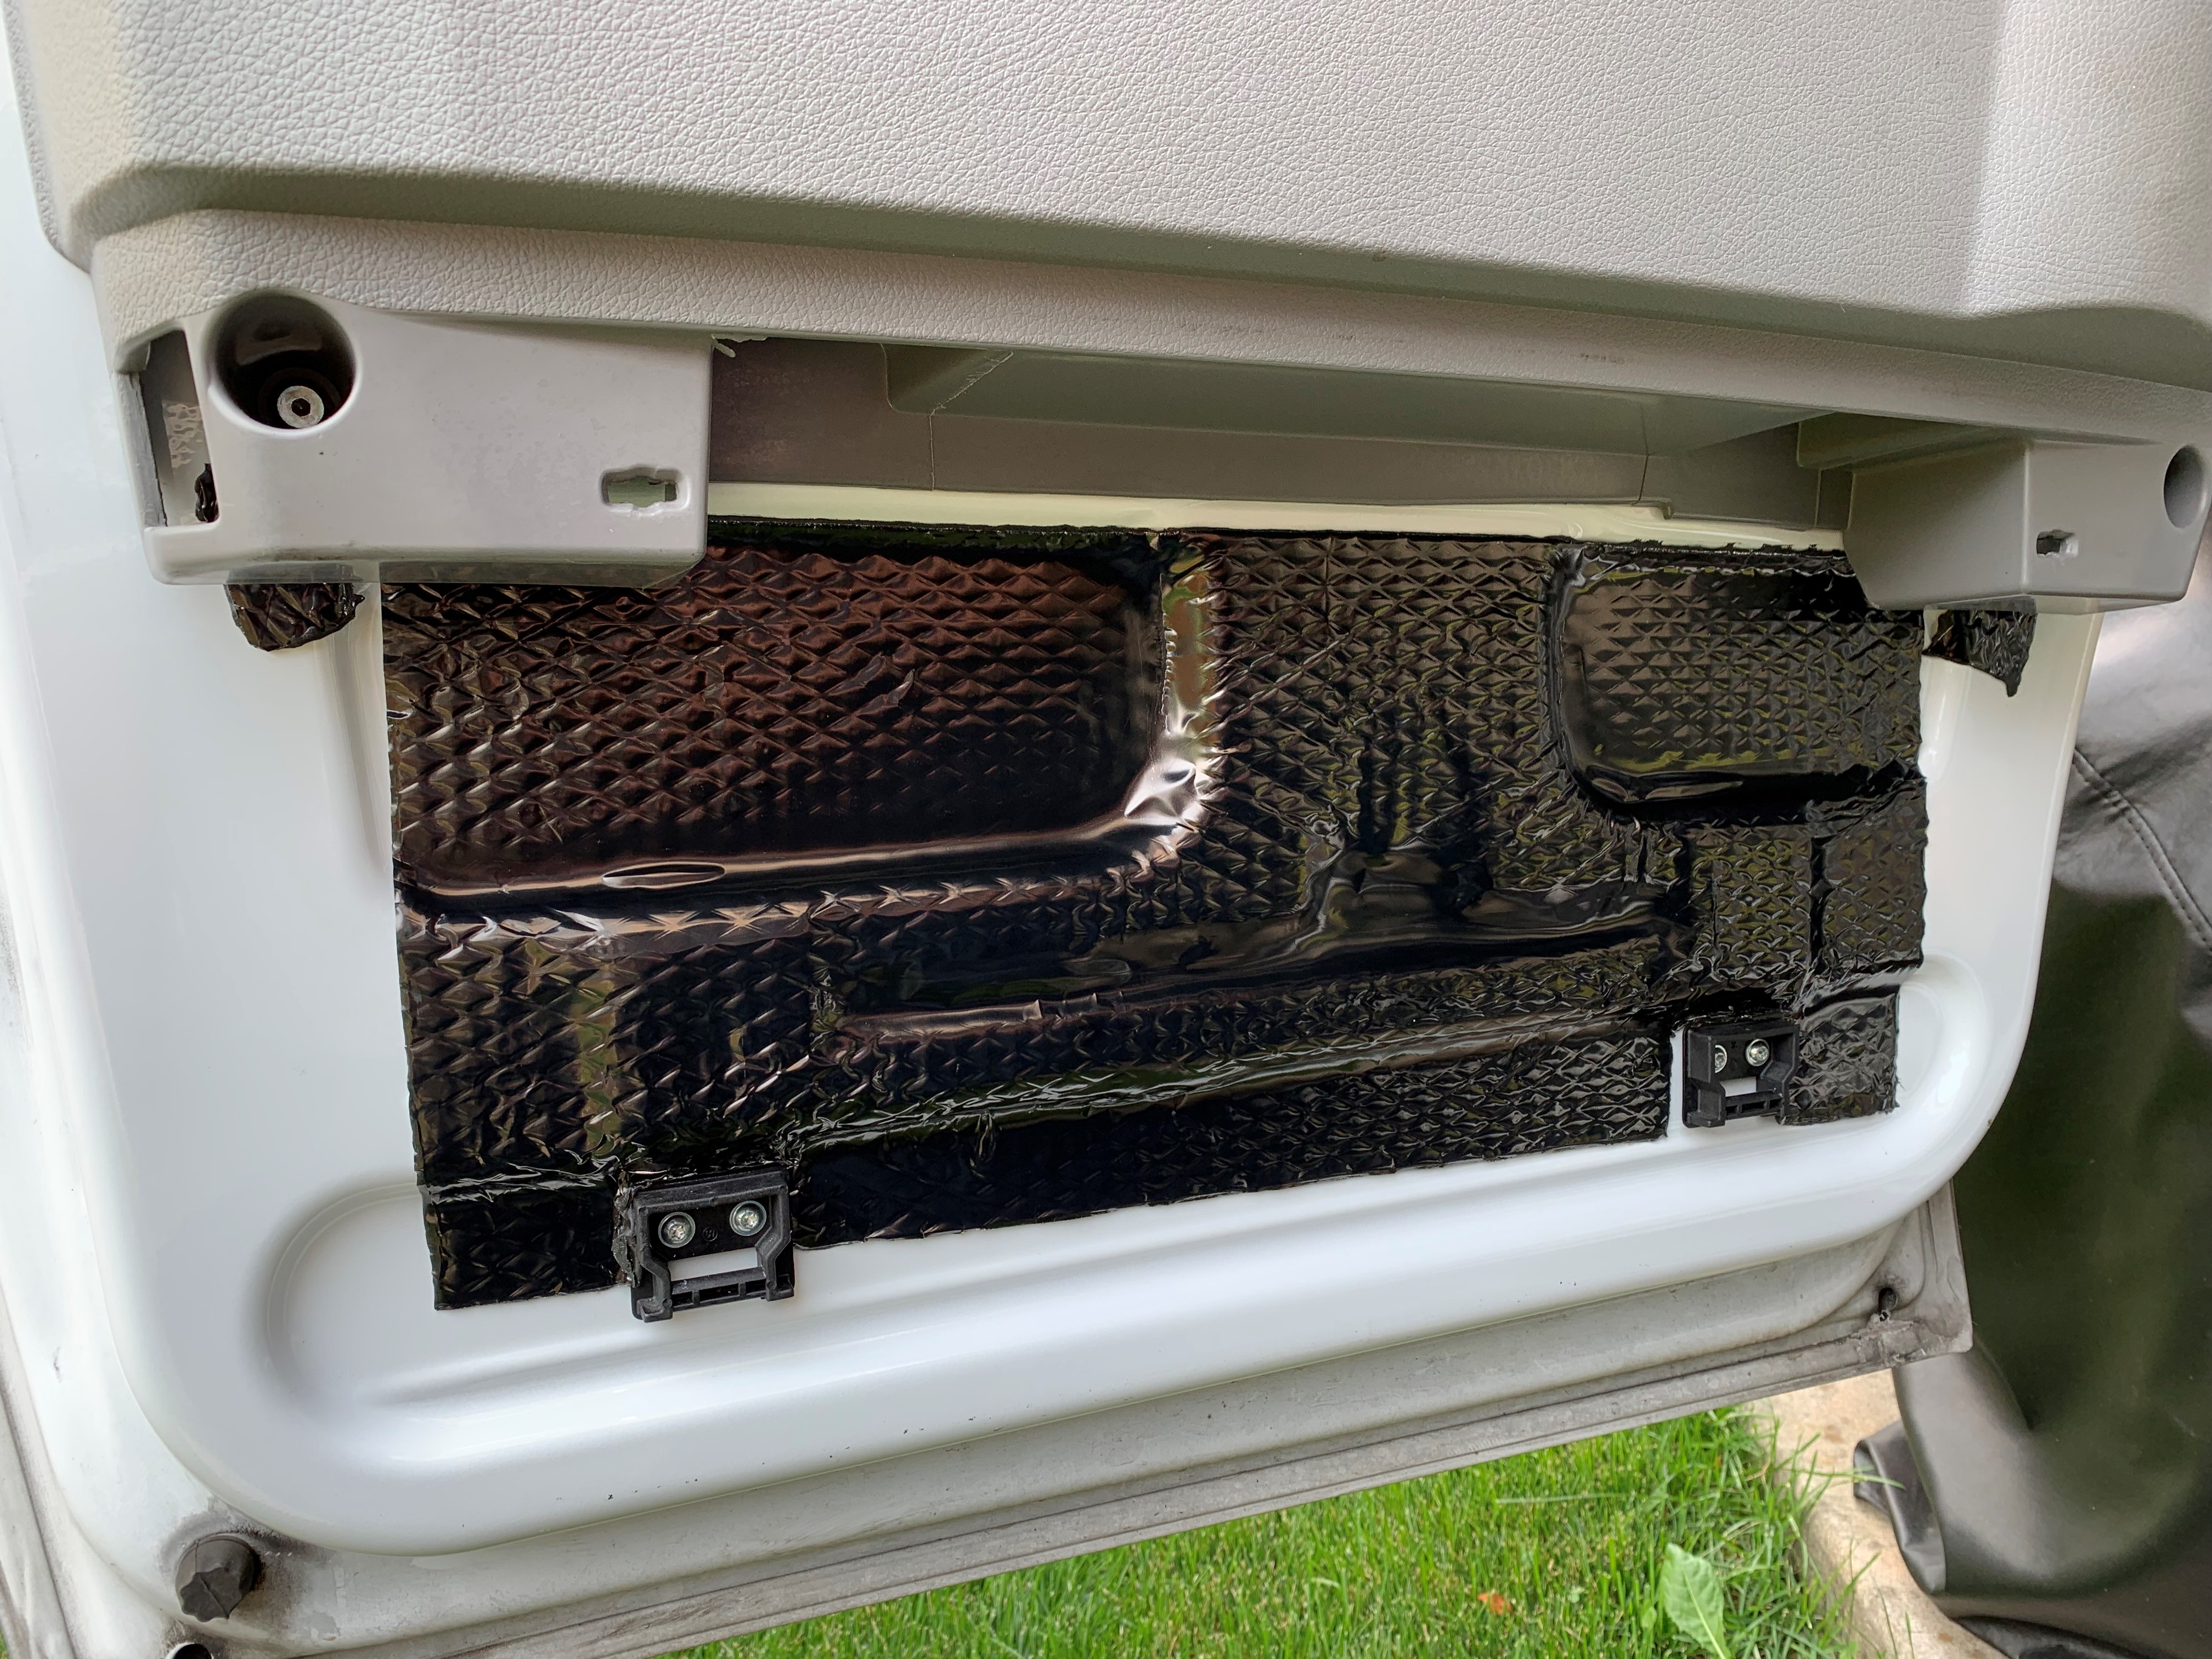 |
All of the screws use a Torx T-25 bit. Make sure you have a good pair of scissors that you don't care too much about - the Butyl will get all over it - cleans up with Acetone. There was enough left over to add to the doors under those map boxes (or whatever they are for!) Definitely noticeable while driving! |
WATER HEATER |
[back to top] |
 |
I had to replace the water heater tank due to freezing (left too much water in the aluminum tank). In the process, I learned that the 110v side of the heater was not working. To start troubleshooting the Atwood water heater, take your multimeter and check all 12v and make sure that it is registering 12v all the way from the feed, through the circuit board, and to the rear 110v relay for the 110v heater rod. Same for the propane side - check if it is generating a spark from the propane spark electrode (the white "rod" in the lower-right of the photo). When checking 12v, make sure you have the water heater set to request/use 110v, when checking propane, make sure it is set to request/use propane. It can be any number of things - follow the current. I had a problem with most of the components on my water heater. After replacing the tank, the 110v side didn't work. I replaced the heat thermostatis (where "ECO and TSTAT" are) and Thermal Cutoffs. After that, the 12v line was registering only 5v at the 110v relay, so replaced the main circuit board (top-right of the photo - expensive) - this also has a 2amp fuse on the board - check that first. Then I had 12v at the water heater relay, but the relay wasn't switching 110v side, so had to replace that (wired wrong and blew it, had to replace again). Then, I checked the resistance (ohms) on the 110v heating element (greater than zero, good!). Finally, had a water heater and tank that worked on both 110v and propane! whew! I also replaced the drain plug and the temperature and pressure valve to ensure everything was done! The bottom line, the multi-meter is your best friend! I cleaned up the rust around the outside with a wire brush, then wiped with denatured alcohol. Once clean and dry, I applied 3 coats of Anti-Rust Treatment waiting just 5 minutes inbetween coats. After I let the final coat dry over night, I applied three thin coats of Rustoleum High Heat Satin Black paint allowing 1 hour inbetween coats. After allowing the final coat to dry over night, I reassembled everything. Came out looking almost new! |
ACCUMULATOR TANK |
[back to top] |
 |
My water pump was cycling all the time - even after the smallest usage. I installed a 2 gal water accumulator tank (bladder). What an amazing difference! No more water pump cycling while brushing teeth, washing dishes, taking shower, etc!!! It took less than a half hour of time. I'm not sure why these don't come standard! This one comes pre-pressurized at 30psi and is perfect for the pump settings - no adjustment was needed. Plumbing items needed: PEX pipe (blue for cold), a male threaded 1/2" NPT elbow with PEX crimp on one end, a couple of PEX elbows, and a PEX tee to install. Get a good quality PEX crimper, a PEX cutter and PEX crimps. First, follow the pump's OUTPUT line past where it tees off to the winterizing water-heater cut-off valve (white plastic valve next to the thermometer in the middle of the picture) and cut the existing PEX pipe with a PEX cutter. Attach the male threaded NPT to PEX elbow to the bottom of the tank (use thread sealant) so that it points to the left (pointing toward passenger side of RV). Attach about a foot of PEX pipe to the NPT/PEX-elbow now on the bottom of the tank and crimp - position heading inward as shown in the picture. Mount the tank to the wall. Next, attach a PEX elbow and crimp. Attach about 4 inches of PEX pipe to the other end of the PEX-elbow and crimp. Attach the PEX tee to it and to both cut ends of the existing PEX pipe (don't forget to slide the crimps on BEFORE the pipe). After getting the placement you want, crimp all three sides of the tee. This is a good time to inspect the pump and clean out the filter-screen. If you need to replace it, this is the replacement pump. |
AIR CONDITIONER |
[back to top] |
 |
Air Conditioner Air Flow Improvement Watch video on YouTube Simple A/C modification to dramatically improve air flow in the RV ducts and the efficiency of your roof A/C unit. all you need is: AC Foil Tape 1 inch rigid foam insulation board Jig saw or Break-off razor knife (note: Jig saw is much easier) Tape measure
|
SUSPENSION |
[back to top] |
 |
When Winnabego added the camper body on the chassis, they did not upgrade the suspension to match - leaves a lot to be desired. For the rear shocks, I was looking at the new Fox shocks, but they had a 6+ month wait time. I decided to go with Bilstein B6 Monotube Rear Shocks and am extremely happy with them! I replaced the rear sway bar with the Hellwig Sway Bar pre-2019 Sprinter models (7254) or Hellwig Sway Bar 2019 and after Sprinter models (7777). |
 |
Replaced the front and rear bump-stops with Sumo Springs (black-900lb capacity/stiffness) - Front Sumo Springs and Rear Sumo Springs. Wow, what a difference! The Hellwig rear sway bar reduces "drifts" from passing semi's, wind, etc. To the left are some pictures of it - you can see the big difference in the bump-stops/springs between stock and the Sumo Springs. Generally rides a little stiffer, but I like it! |
 |
All of these changes make a significant difference to the overall ride, handling, and stability on the road. Strongly recommended! Pretty easy DIY project - overall, took about 2 hours. For additional information here is a good writeup on How a sway bar works |
AWNING |
[back to top] |
 |
Our awning's side was loose - the side without the motor. Had about 2-3 inches of play and would flap around. I saw a post from the awning manufacturer that all that was needed was to replace the little "trim line" that was inside the left-hand seam with larger line. I purchased some plastic 5/32 inch clothes line. |
 |
I used a razor blade to cut a small slit into the left-hand seam (both ends) of the awning only to find NOTHING THERE.... well, I decided to proceed anyway and insert the new line in. Just thread it through with a steel rope wire puller, cut the excess off, and tucked the ends in. |
 |
PERFECTION!!! No more flapping in the wind! Absolute love when it is this easy! |